
How to make a microwave bowl cozy with precuts
If you have been quilting for any length of time, you most likely have a stack of precut 10″ fabric squares in your stash. Many of them are probably unopened, but you may also have some odd pieces left from quilts that did not use all of the squares. There are many quilt patterns that you can make using these handy precuts, however, there are other quick projects that they are useful for as well!
The handmade gift I have had the most feedback from over the years has been one of the simplest: microwave bowl cozies. I made a dozen or so of them about five years ago and gave them as holiday gifts. I have had many of the recipients ask “When are you making more?” or suggest that I give them as gifts to others. If that isn’t a successful handmade gift, I do not know what is!
Microwave bowl cozies can be made in a variety of sizes and shapes, and this tutorial can easily be adjusted to the size you desire. Since I am on a mission to use up some leftover 10″ precut Layer Cake squares, we will use that as our fabric size. This finished size is good for medium-sized bowls to serve veggies or other sides at the table, and if you make the darts slightly deeper (say 2.5″ – 3″), it will work nicely with a deep, oversized soup bowl.

Materials:
- Two (2) 10″ 100% cotton fabric squares per bowl cozy
- Two (2) 9.75″ – 10″ squares 100% cotton batting (no scrim, no resins!*)
- 100% cotton thread
- Sewing machine
- Pins or Wonder Clips
- Walking Foot or Dual Feed (optional)
- Fabric friendly, washable glue stick (optional)
*The batting must be free of scrim, resins, or any other materials that can catch fire. Be careful as most cotton battings on the market have scrim or resins of some sort. Batting marketed for these projects will ensure they are truly 100% cotton. Quickie Wrap by Bosal, Wrap-N-Zap by Pellon, or Warm 100 by The Warm Company are some options.

Instructions:
1. Select two (2) 10″ cotton fabric squares per bowl you would like to make.
2. Cut two (2) 9.75″-10″ squares of microwave-safe batting (see the note above*). I like to cut mine a little smaller (9.75″) to reduce bulk, but you can also cut it the same 10″ size as the fabric and trim it after, or leave it as is.
3. Center each square of batting on the wrong side of the 10″ pieces of fabric and pin into place. Alternately, use a few dabs of washable, non-toxic glue stick to keep it in place.
4. Mark diagonal lines on the batting side of each piece with a washable marking pen.
5. Sew on the two diagonal lines on both 10″ batting/fabric pairs. A walking foot or dual feed enabled machine can be helpful for this step, but are not needed. Work with what you have, just be careful that pieces do not shift.

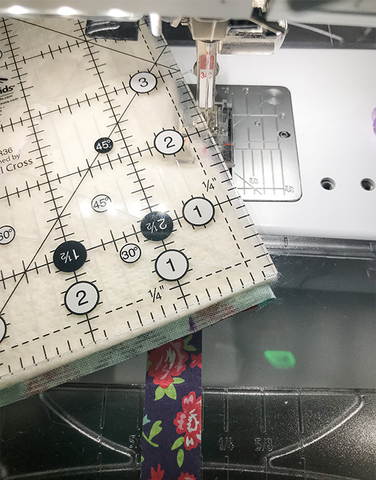
6. Now mark a 2″ – 3″ long line at the center of each side, starting at the edge and moving towards the center. Next mark a small dot or tick mark 1-inch from each horizontal and vertical marking on one side (either right or left side). Sometimes I forget this second step and do it at the machine (see picture below).
7. Fold the batting/fabric piece in half, right sides together and sew from the tip of the 2″ – 3″ mark diagonally towards the 1″ tick-mark to make your dart. Repeat on the remaining three sides of the piece, then do the same on the second batting/fabric piece. Trim each dart 1/4″ from the stitching.

8. Next, nest the two darted batting/fabric pieces right sides together and clip (or pin) the edges together all the way around.

9. Stitch a 1/4″-5/8″ from the edge all the way around, leaving a 2.5″ – 3″ opening so that you can turn the piece right side out. Trim the four corners to reduce bulk, turn it right side out, using a bodkin or other tool to make sure the corners are neat.

10. Pin or clip the opening closed and topstitch 1/4″ from the edge, all the way around being sure you close the opening completely.
ALL DONE!
Republished from 2020